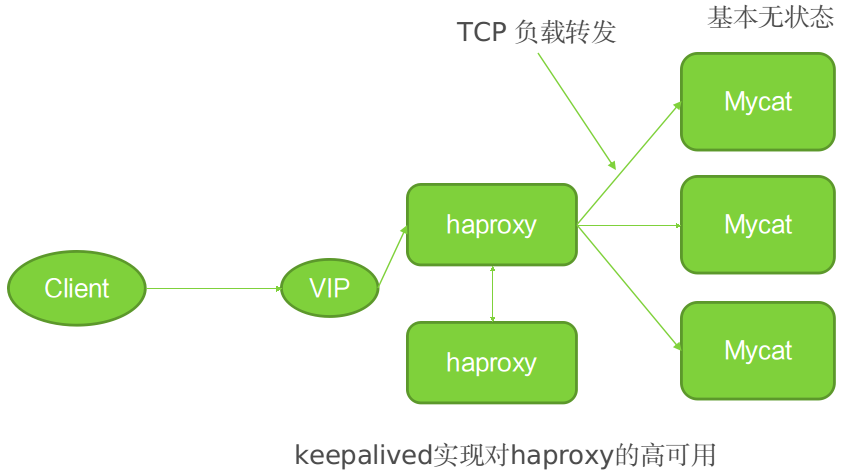
MyCAT 在生产环境中,需要解决自身的高可用问题。一种常见的做法是使用 MyCAT + Haproxy 高可用集群,这中做法在 mysql 集群中已经很常见了。对于 MyCAT 集群,其大致架构图如下,
环境介绍
出于简便考虑,本文的搭建环境在单台服务器上,MyCAT、Haproxy 均安装在这个服务器上,操作系统是 Ubuntu14.04。MyCAT 的 mysql 数据库采用 docker 容器,监听本地端口3306。本机 IP 192.168.2.201,并配置了 hosts 如下,
1 2 3 4 5
| 192.168.2.201 ubuntu-haproxy1 192.168.2.201 ubuntu-haproxy2 192.168.2.201 ubuntu-mycat1 192.168.2.201 ubuntu-mycat2
|
MyCAT 配置
由于两个 MyCAT 装在一台机器上,因此需要修改其中一台的监听端口,修改 server.xml 文件,增加以下内容,
1
| <property name="serverPort">8067</property> <property name="managerPort">9067</property>
|
安装 Haproxy
先要新增haproxy用户。然后进行下载代码,编译和安装,我用的是 1.6.3 版本,地址在这里。
1 2 3 4 5 6
| $ cd /home/arnes/project/mycat-ha/ $ tar xzf haproxy-1.6.3.tar.gz $ cd haproxy-1.6.3 $ make TARGET=linux2628 PREFIX=/home/arnes/project/mycat-ha/haproxy1.6.3-1 $ mkdir -p /home/arnes/project/mycat-ha/haproxy1.6.3-1 $ make install PREFIX=/home/arnes/project/mycat-ha/haproxy1.6.3-1
|
具体的编译选项可以参考源码包中的 README 文件。如果需要安装两份,只需要运行两次 make install 即可,注意:这里的 PREFIX 参数不能用环境变量缩写,如 ~ 表示 HOME 目录。
然后编辑 Haproxy 的配置文件 haproxy.conf,在 /home/arnes/project/mycat-ha/haproxy1.6.3-1 目录下,
1 2 3 4 5 6 7 8 9 10 11 12 13 14 15 16 17 18 19 20 21 22 23 24 25 26 27 28 29 30 31 32 33 34 35 36
| global maxconn 512 daemon pidfile /home/arnes/project/mycat-ha/haproxy1.6.3-1/haproxy.pid defaults mode tcp option redispatch option abortonclose timeout connect 5000ms timeout client 30000ms timeout server 30000ms balance roundrobin log 127.0.0.1 local0 info listen admin_status bind 192.168.2.201:48800 stats uri /admin-status stats auth admin:admin mode http option httplog listen allmycat_service bind 192.168.2.201:8096 mode tcp option tcplog option httpchk OPTIONS * HTTP/1.1\r\nHost:\ www balance roundrobin server mycat_133 192.168.2.201:8066 check port 48700 inter 5s rise 2 fall 3 server mycat_134 192.168.2.201:8067 check port 48700 inter 5s rise 2 fall 3 listen allmycat_admin bind 192.168.2.201:8097 mode tcp option tcplog option httpchk OPTIONS * HTTP/1.1\r\nHost:\ www balance roundrobin server mycat_133 192.168.2.201:9066 check port 48700 inter 5s rise 2 fall 3 server mycat_134 192.168.2.201:9067 check port 48700 inter 5s rise 2 fall 3
|
对于另一个 Haproxy 的配置比较类似,只要改一下 listen 的端口即可。
启动 MyCAT 和 Haproxy
MyCAT 的启动没有什么特别之处,
1 2 3 4
| $ ./mycat restart Stopping Mycat-server... Mycat-server was not running. Starting Mycat-server...
|
Haproxy 的启动也比较简单,如下,
1
| $ ./sbin/haproxy -f haproxy.conf
|
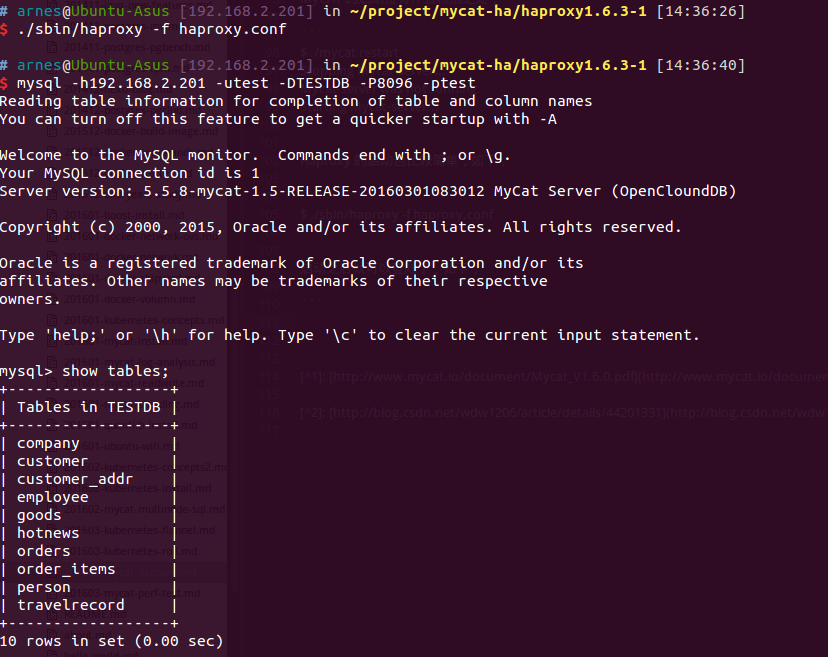
启动之后就可以登陆了,如下,
1 2 3 4 5 6 7 8 9 10 11 12 13 14 15 16 17 18 19 20 21 22 23 24 25 26 27 28 29 30 31 32
| $ mysql -h192.168.2.201 -utest -DTESTDB -P8096 -ptest Reading table information for completion of table and column names You can turn off this feature to get a quicker startup with -A Welcome to the MySQL monitor. Commands end with ; or \g. Your MySQL connection id is 1 Server version: 5.5.8-mycat-1.5-RELEASE-20160301083012 MyCat Server (OpenCloundDB) Copyright (c) 2000, 2015, Oracle and/or its affiliates. All rights reserved. Oracle is a registered trademark of Oracle Corporation and/or its affiliates. Other names may be trademarks of their respective owners. Type 'help;' or '\h' for help. Type '\c' to clear the current input statement. mysql> show tables; + | Tables in TESTDB | + | company | | customer | | customer_addr | | employee | | goods | | hotnews | | orders | | order_items | | person | | travelrecord | + 10 rows in set (0.00 sec)
|
如果真正在生产环境中,MyCAT 和 Haproxy 会部署在不同的服务器上,而且 Haproxy 还需要与 keepalived 一起部署,还需要进一步研究,在此不再赘述。